 /========================\
 |     SYSTEM ARTICLE     |
 \========================/
- Published on
- > DATE:
 /====================\
 |    SYSTEM OUTPUT   |
 \====================/
> Monitor Rails 7 applications with New Relic One
====================
- Authors
-
-
- Name
- >
-

The first major release of the Rails framework in more than two years brings an entirely new approach to full-stack web development. Rails 7 now includes methods to incorporate Node packages without installing Node, real-time interactivity in the browser with Hotwire, and numerous other features.
As you build increasingly complex applications with the latest release of Rails, it’s important to monitor your application stack for performance and quickly troubleshoot any issues before they're on fire. You can use New Relic One to monitor your application’s performance and diagnose issues.
In this tutorial, you'll add the New Relic Ruby agent to a Rails 7 application and deploy it to Render, a cloud application hosting provider. You'll also add an error “feature” that allows you to manually create errors in your production application that you can monitor in New Relic One.
This tutorial assumes a working knowledge of:
- Ruby on Rails
- Running commands in the terminal
- GitHub
TL;DR You can find a complete working application on GitHub at https://github.com/hummusonrails/new-relic-rails-7-demo if you want to clone the repository and try it out!
Create a Rails application
First, you'll need to create a Rails application on your machine:
bundle exec rails new nr-rails-7 –css tailwind –database postgresql
This tutorial uses Rails 7.0, the latest major release of the framework. It will work with earlier versions of Rails as well, but you won't be able to use the --css tailwind flag for instantiating a new Rails application with any version earlier than 7.0. This application uses TailwindCSS for styling and includes PostgreSQL. You won’t be using the database in this sample application, but it will be available if you choose to extend it.
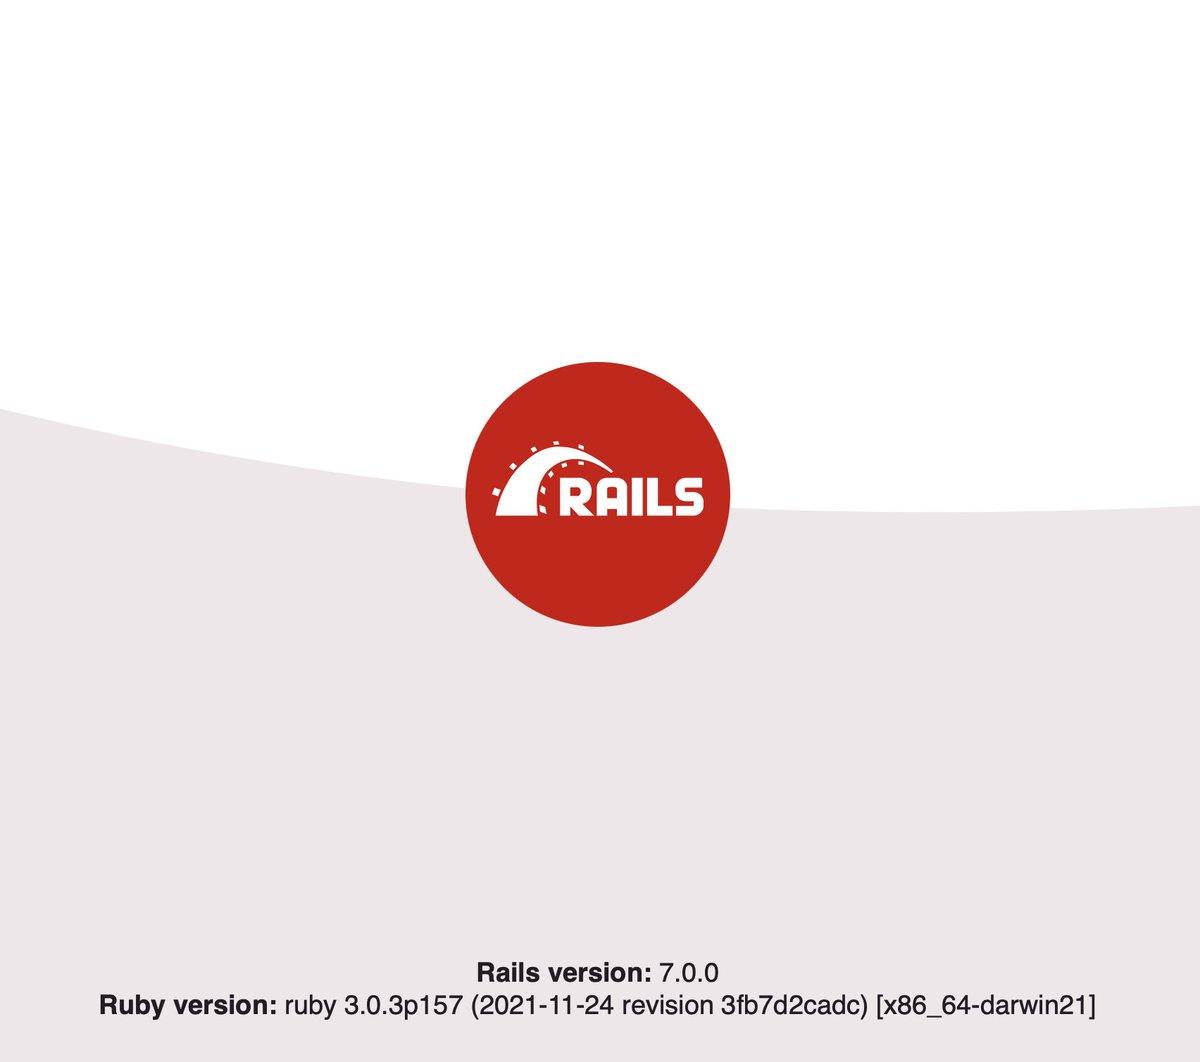
You should see the following welcome page after you install and boot the application:
Now you're ready to add a route and a view to the application.
Set up the Rails route and view
You'll generate a Home controller with an empty #index action.
To make the application look nicer, you can add basic HTML with TailwindCSS styling. In the views/home/index.html.erb view, add the following code:
<section>
  <div class="bg-black text-white py-20">
    <div class="container mx-auto flex flex-col md:flex-row items-center my-12 md:my-24">
      <div class="flex flex-col w-full lg:w-1/3 justify-center items-start p-8">
        <h1 class="text-3xl md:text-5xl p-2 text-yellow-300 tracking-loose">Rails 7.0</h1>
        <h2 class="text-3xl md:text-5xl leading-relaxed md:leading-snug mb-2">❤️ New Relic</h2>
    <p class="text-sm md:text-base text-gray-50 mb-4">Add New Relic monitoring to your Rails 7 app deployed on Render</p>
    <a href="#" class="bg-transparent hover:bg-yellow-300 text-yellow-300 hover:text-black rounded shadow hover:shadow-lg py-2 px-4 border border-yellow-300 hover:border-transparent">Get Started</a>
      </div>
      <div class="p-8 mt-12 mb-6 md:mb-0 md:mt-0 ml-0 md:ml-12 lg:w-2/3  justify-center">
        <div class="h-48 flex flex-wrap content-center">
      <div>
            <img class="inline-block mt-28 hidden xl:block" src="https://user-images.githubusercontent.com/54521023/116969935-c13d5b00-acd4-11eb-82b1-5ad2ff10fb76.png">
          </div>
      <div>
            <img class="inline-block mt-24 md:mt-0 p-8 md:p-0"  src="https://user-images.githubusercontent.com/54521023/116969931-bedb0100-acd4-11eb-99a9-ff5e0ee9f31f.png">
          </div>
      <div>
            <img class="inline-block mt-28 hidden lg:block" src="https://user-images.githubusercontent.com/54521023/116969939-c1d5f180-acd4-11eb-8ad4-9ab9143bdb50.png"></div>
          </div>
    </div>
      </div>
    </div>
</section>
Next, make sure to add the route for the home#index view to your routes configuration file to properly navigate to the view.
That’s it! You’ve successfully set up our Rails application with a single view and the correct route and corresponding controller method. Now, you will add New Relic to your app.
In the end, you’ll go back and refactor the app to add the error button feature once you have installed New Relic.
Set up New Relic One
Now that you have a functioning Rails app, it is time to add New Relic One monitoring and observability to it. There are three steps to follow:
- If you don't have one already, create a New Relic account. It is free to create and will always remain free.
- Install the Ruby gem.
- Download the New Relic config file.
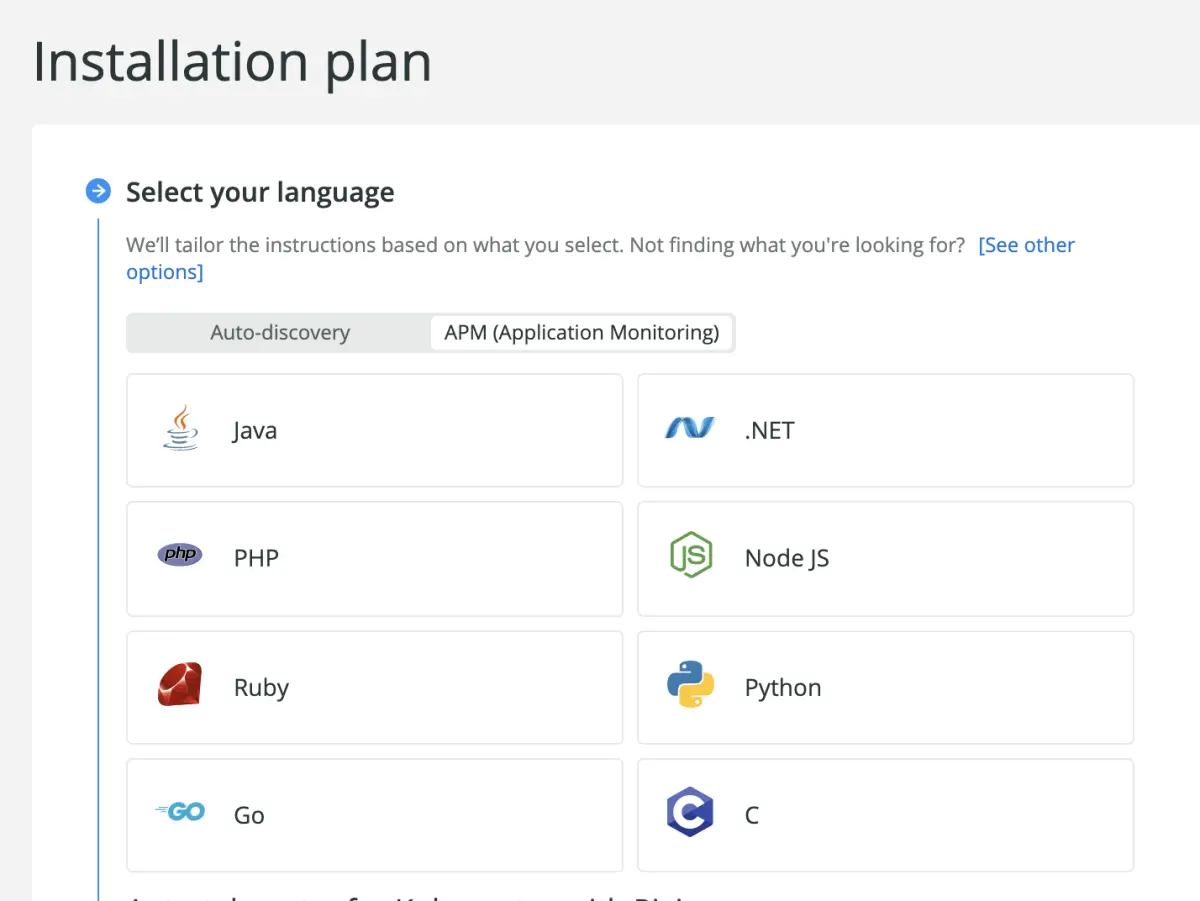
After you create a new account, you’ll be prompted to add your first application for application performance monitoring. Start by selecting the Ruby icon in the list.
The installer wizard then guides you to create a configuration file that you place in the /config folder of the Rails application. Make sure that you don't commit your secrets to a public repository on GitHub. Select yes on the question if you are using Bundler. Then add the gem to your Gemfile, as instructed on the page.
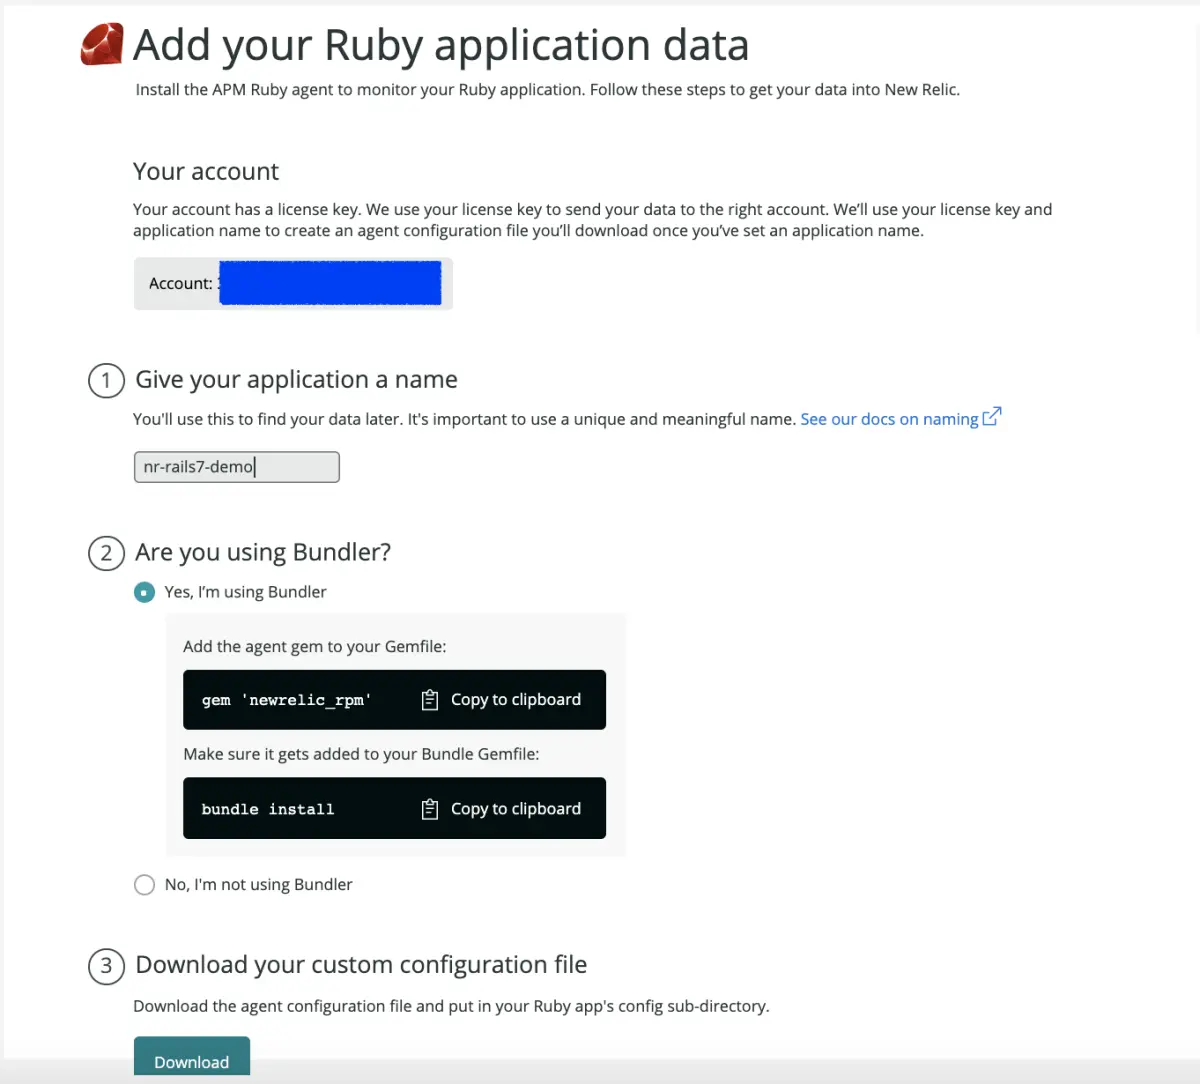
After you have finished this process, run bundle install from the command line to install the New Relic gem that you added to your Gemfile.
Now you have New Relic One successfully set up in your app and are ready to deploy to Render!
Deploy to Render
Render is a new cloud deployment service that makes getting your apps on the web a relatively painless and straightforward process. You are going to deploy to Render with three steps, not including
- If you don't already have one, create your free Render account.
- Add a
render.yamlfile to the root folder of the app. - Create a Render blueprint, which is a way to quickly create multiple services (in this case, the web app and the database) in one shot and deploy it.
The second step will automatically load the app from GitHub and deploy it. It will also redeploy without you needing to do anything anytime you merge a change to the main branch.
First, let’s create the render.yaml file. The instructions in the file will also reference a shell script that you'll add after creating the YAML file.
databases:

  - name: nr-rails-7

    databaseName: nr-rails-7

    user: nr-rails-7


services:

  - type: web

    name: nr-rails-7

    env: ruby

    buildCommand: "./bin/render-build.sh"

    startCommand: "bundle exec puma -C config/puma.rb"

    envVars:

      - key: DATABASE_URL

        fromDatabase:

          name: mysite

          property: connectionString

      - key: SECRET_KEY_BASE

        generateValue: true
This file tells Render to create a web service and a database, both named nr-rails-7. It then instructs Render to run the build script in bin/render-build.sh, which you'll add next. Then you'll start the app by booting up with puma.
To add a new file in the bin/ folder called render-build.sh, run this command:
#!/usr/bin/env bash

# exit on error

set -o errexit


bundle install

bundle exec rake assets:precompile

bundle exec rake assets:clean

bundle exec rake db:migrate
Make sure to commit both the new YAML and script files to GitHub.
After committing both files to your main branch on GitHub, it’s time to create the blueprint on Render.
Navigate in your browser to https://dashboard.render.com/blueprints and select the New Blueprint Instance button. This opens a page asking you to connect your GitHub account to Render and choose the repository of your Rails app. Render will find the render.yaml file in the root directory and run the instructions in it.
The process for deployment will typically take 2-3 minutes. As soon as it is done, you can visit the URL provided by Render and see your site live on the web!
At this point, you are ready to start analyzing your observability data on New Relic One. The more you and others interact with the site, the more data will be generated in your New Relic One dashboard.
Create an error in the app
To demonstrate the potential for New Relic observability in your Rails app, let’s intentionally cause an error and see how you can use New Relic One to quickly diagnose it. You'll see how to find the error's cause so you can remedy it.
1. Open up the codebase for your application again in your code editor and you’ll add the following link in your app/views/home/index.html.erb right under the Get Started link:
<a href="/demo/error" class="mt-5 bg-transparent hover:bg-red-600 text-red-600 hover:text-black rounded shadow hover:shadow-lg py-2 px-4 border border-red-600 hover:border-transparent">Make an Error</a>
2. Then, open up the controller file in app/controllers/home_controller.rb and add one more method for the /error path:
def error
  DoesntExist.some_method
end
3. Add the route to the /config/routes.rb file:
get “/home/error”, to: “home#error”
4. Save the changes you just made and push them up to your main branch on GitHub. Render will automatically deploy them to your live app in production from that branch.
5. Now, when you navigate to your website, you'll see a bright red Make an Error button. Select it and you’ll be greeted with the familiar Rails error page in production!

This error page intentionally obscures what the error was for obvious reasons. You often do not want your users seeing the internals of your application and having class names, methods, database tables, and more exposed to the internet. However, that can also make discovering what went wrong a bit more challenging, especially in large complex applications.
You can use New Relic One to swiftly identify the error, and see pertinent details about it.
6. After you manually generate errors in the application, navigate to the summary view of your New Relic One dashboard. The summary view provides several windows into different aspects of your application’s performance. The Error Rate chart in the dashboard shows the errors as they occur.
You can click through to further investigate the errors through either the left navigation to Errors Inbox or through the Error rate visualization:
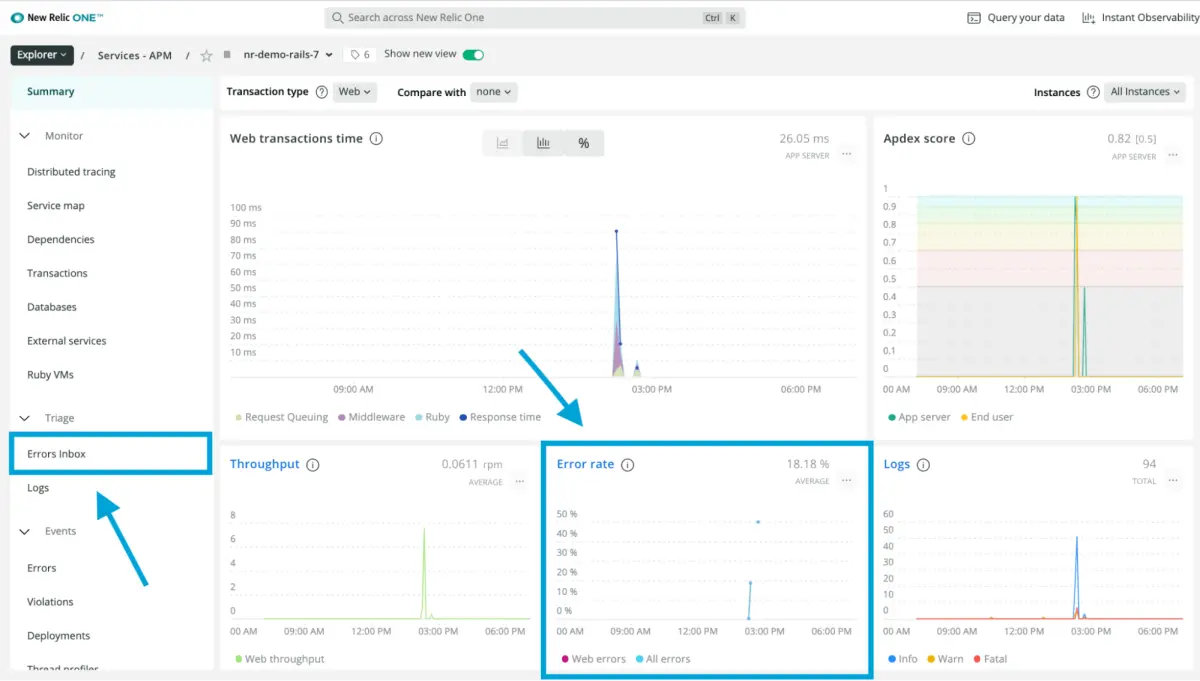
After you click through to the errors in the error rate visualization, you are presented with details on the frequency of the errors and when they happened. You'll also see the type of errors on both the left-hand side and in the error traces tab.
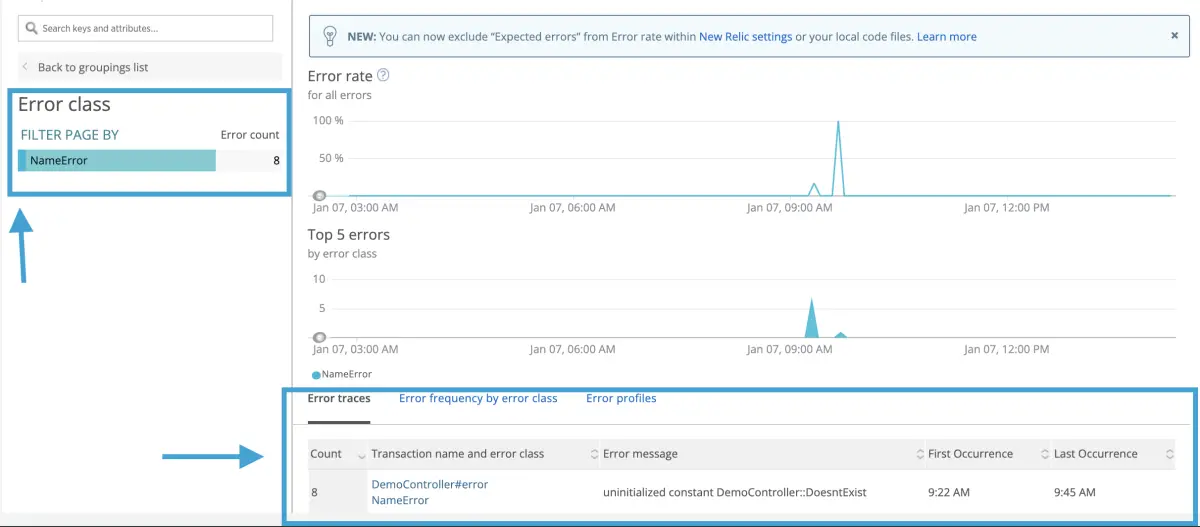
This information alone already significantly empowers you to be able to diagnose the issue and begin to resolve it. The data presented shows that there was a NameError, and within the error trace table you can see it involved the #error method in the DemoController. However, you can take it a step further and get even more detail by clicking one more level through in the trace.
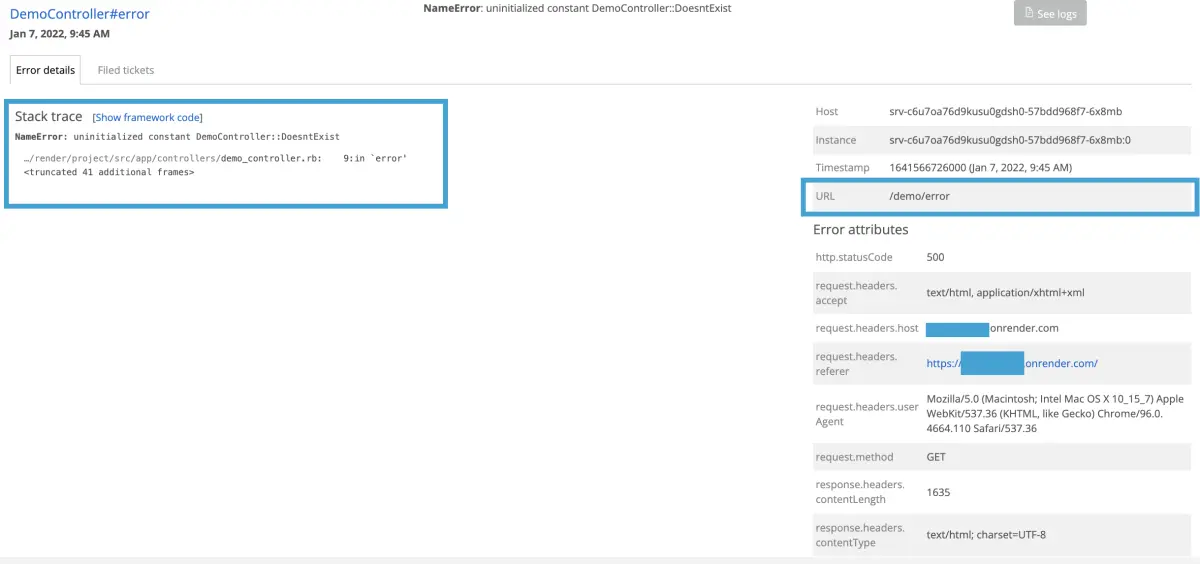
This view clearly shows that the issue is an uninitialized constant called DoesntExist that was invoked in line 9 of the controller within the #error method. That kind of data within a modern day application consisting of countless models, helpers, controllers, and more can be invaluable in saving time and fixing an issue as efficiently as possible.
Next steps
Want to learn more about what you can do with New Relic One? Check out the New Relic Docs. If you’re not already a New Relic customer, request a demo or sign up for a free trial today.
